It has been a while since I wrote the last part of the Build Simple Fuzzer series. Due to personal reasons I had some issues finding time to continue with it. On top of that, having a semi-working fuzzer deprived me of will to continue - mainly because there were no obvious avenues where to direct my attention. I’m far from thinking that my fuzzer was good or complete but it was working, finding shallow bugs and the next step required much more work than I was able to pour into it. At least at that time.
The initial language was also partially to blame. Choosing python, while making the start super easy made making a meaningful progress a bit of challenge in later phases. Against the wind and with fifteen minutes stolen here and there I finally rewrote my fuzzer in Rust. Say hello to rfuss2.
Why Rust? First of all, because I wanted to be a cool hipster kid writing in some new language. However, after learning the language a bit it really grew on me - it’s sufficiently close to the metal that I can express what I want to achieve and sufficiently far from C that I don’t feel like clubbing pointers to make them behave. In all seriousness - Rust allows you to write a system code that is very fast and efficient.
System programming
Few months ago I wrote a short article about system programming in Rust1. Looking at the code right now I feel a hint of embarrassment but I at least hope I can rectify all my inefficiency here. First of all I try not to nest match directives when there is no clear need for it. Second thing - use proper crates where possible - I’ve already mentioned nix crate but there are few others worth mentioning. Good example is clap for parsing command line arguments. Also, don’t forget that the standard library also has a lot of interesting elements - like for example the BTreeSet collection that we use in our mutator to keep track of unique traces.
Target practice
Atypically, we are not going to start with Rust but with C. Main reason for that is that we are going to need a vulnerable program to act as a testing bed for our fuzzer. In this case C seems like the most natural choice.
The most important part of the program is this function presented below.
void do_comparison(char* data) {
  if (data[0] == 'A') {
    if (data[1] == 'B') {
      if (data[2] == 'C') {
        if (data[3] == 'D') {
          if (data[4] == 'E') {
            if (data[5] == 'F') {
              // This is going to crash
              char* crash = 0;
              crash[0] = 'X';
            }
          }
        }
      }
    }
  }
}
The premise of it is simple - the moment we provide this function with a pointer to string ABCDEF the program is going to crash because of an attempt to write value to an address 0. Reason behind why every character is checked in a separate, nested if clause is that after compilation every check will happen in separate block and we will be able to easily instrument it.
Some people might say this is not a very realistic pattern but you might be actually surprised. Compilers actually tend to implement parsing and recognizing certain keywords this way. Take a look at Crafting Interpreters book, particularly a chapter that teaches us how to parse keywords. It turns out that a few nested switch statements is the fastest method to do it. Many real language parsers are using similar techniques and that makes them great for fuzzing and increasing coverage.
Still, I strongly believe that to truly understand, and most importantly test your fuzzer you need to run it against that target that offers proper introspection and as few surprises as possible. Testing your tools against black box offers a very murky picture of what is actually happening - maybe you are not finding crashes because of some tiny flaw2 in your mutation strategy. Such flaws might easily be dismissed by assuming that program you know very little of, doesn’t actually have vulnerabilities.
Main loop
If you have been following the series closely before you should be familiar with the main loop of the program.
while go {
  for mut sample in &mut mutator {
    // Save sample
    sample.materialize_sample(FILE);
    let child_pid = child::run_child(&runtime_config, &mut bp_mapping, FILE);

    stats.fuzz_cases += 1;
    match parent::run_parent(child_pid, &bp_mapping) {
      parent::ParentStatus::Clean(trace) => {
        sample.add_trace(trace);
        sample_pool.push(sample);
      }

      parent::ParentStatus::Crash(rip) => {
        stats.crashes += 1;
        println!("[!] Crash for input {:?}", sample);
        let crash_filename = format!("crash_{}", rip);
        fs::copy(FILE, crash_filename)
        .expect("Failed to save crash file");
        go = false;
      }
    }
  }

  // Send back all the sample with traces to the mutator
  mutator.update(&sample_pool);
}
As expected there are almost no surprises here - we spawn a child and a parent. Child runs a ptrace::traceme() while the parent attaches to it and monitors its behavior.
The main different how I run the child is using bit more of a Command functionality:
let child = unsafe { Command::new(&config.prog_name)
  .arg(filename)
  .stdout(Stdio::null())
  .stderr(Stdio::null())
  .pre_exec(|| {
    ptrace::traceme().expect("Process doesn't want to be traced ...");
    personality(linux_personality::ADDR_NO_RANDOMIZE).unwrap();
    Ok(())
  })
  .spawn()
  .expect("[!] Failed to run process")
};
First of all we cobble traceme() and personality syscall together in pre_exec() call. Another notable thing is that we no longer call fork() directly and replace the running code inside the child via exec() but instead we offload this functionality on spawn() call that just creates a new process that we want.
Code inside the run_parent() function looks a bit unfinished because I have not implemented handling all possible events. Simply, I saw no use of it in the current state of the fuzzer.
In case the child signals the parent it has stopped we are checking the reason for that. In the case of SIGTRAP that indicates hitting the breakpoint we update the trace information and continue with the execution. If however the program stopped because of Segmentation Fault (signaled by SIGSEGV signal) we are record the crash information and pass it back to fuzz engine. At the end of child process execution we return the recorded trace back to the engine.
pub fn run_parent(pid: Pid, mapping: &HashMap<u64, i64>) -> ParentStatus {
  let mut trace: Vec<u64> = vec!();

  loop {
    match waitpid(pid, None) {
      Ok(WaitStatus::Stopped(pid_t, signal)) => {
        match signal {
          Signal::SIGTRAP => {
            handle_sigstop(pid, mapping, &mut trace);
          }

          Signal::SIGSEGV => {
            let regs = ptrace::getregs(pid_t).unwrap();
            return ParentStatus::Crash(regs.rip)
          }
          _ => {
            println!("Some other signal - {}", signal);
            let regs = ptrace::getregs(pid).unwrap();
            println!("Error at 0x{:x}", regs.rip - 1);
            break
          }
        }
      },
      // Code here skipped for readability reasons
    }

  return ParentStatus::Clean(trace);
Mutation engine
A set of biggest changes can be seen in our mutation engine. It is comprised of two structures - Sample and Mutator. Let’s start by looking at the first one.
pub struct Sample {
  version: u32,
  data: Vec<u8>,
  method: MutationMethod,
  trace: Option<Vec<u64>>,
}
Each Sample holds the data in the form of a byte array. It can be either materialized as a file, passed to a program as an argument or even sent over the network if that is what we want to implement. Other fields are mostly used for coverage tracking - version records how many successful3 mutation a given sample had and method holds the latest type of mutation that occurred. Both have no practical meaning as far as mutation engine is concerned - at least for now. Sample that was executed by the program gains the trace that consists of addresses of block visited during the run.
Mutator holds all the samples that are passed to a program.
pub struct Mutator {
  corpus:    Vec<Sample>, // corpus
  samples:   Vec<Sample>, // latest mutation round

  // Trace
  trace_list: BTreeSet<Vec<u64>>,

  // associated rng
  rng: rand::prelude::ThreadRng,
}
Compared to our previous implementation in Python this implementation of mutation engine is greatly simplified. Instead of a convoluted mess of four different sample containers tied together with fit and mutation functions we only have two. I will explain the logic behind them in the section about coverage. Last thing worth mentioning is the swappable Random Number Generator that we use to randomly mutate our samples.
Speaking about actual mutations the implementation is fairly agnostic.
fn mutate(&mut self) {
  for sample in &mut self.corpus {
    for _ in 0..100 { //completely arbitraty number
      &self.samples.push(sample.mutate(&mut self.rng));
    }
  }
}
Basically samples from the corpus mutate themselves and create new copies inside samples container. Thanks to that we can later implement appropriate trait and mutate various kinds of samples with unique strategies like for example grammar driven one.
Speaking about mutation strategy of a Sample:
fn mutate(&mut self, rng: &mut ThreadRng) -> Sample {

  let strategy: u32 = rng.gen_range(0..=3);

  match strategy {
    0 => self.bit_flip(rng),
    1 => self.byte_flip(rng),
    2 => self.insert_block(rng),
    3 => self.remove_block(rng),
    // Added so match checker does not complain about non-exhaustive match
    _ => self.raw(),
  }
}
Right now it is fairly simple random choice with linear probability but in the future I would like it to be bit more complicated and possibly influenced by the latest successful mutation.
Coverage
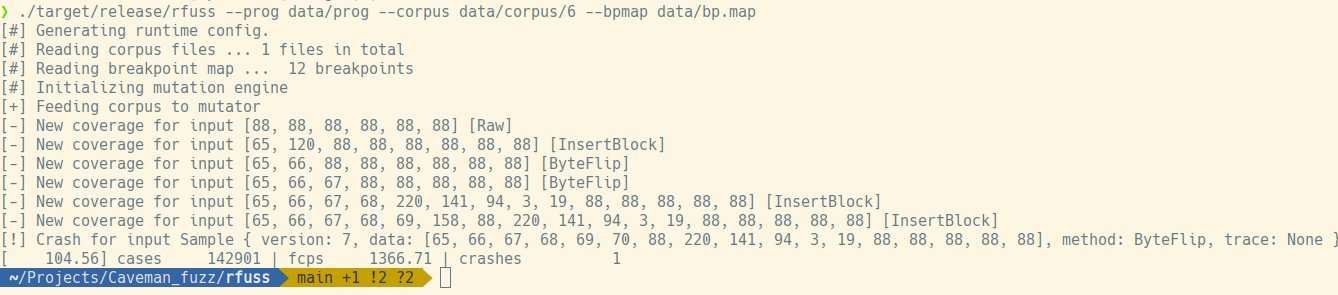
Coverage tracking has been greatly simplified and is essentially governed by one rule - if the sample trace is unique it means that the mutation was successful and the sample gets added back to the corpus for the next mutation round.
// Consume samples with added trace
pub fn update(&mut self, samples: &Vec<Sample>) {
  for sample in samples {
    match &sample.trace {
      Some(trace) => {
        if !self.trace_list.contains(trace) {
          println!("[-] New coverage for input {:?} [{:?}]",
            sample.data, sample.method);
          self.corpus.push(sample.clone());
          self.trace_list.insert(trace.clone());
        }
      },
      None => {
        println!("[!] missing trace info ...");
      }
    }
  }
  self.mutate()
}
This approach was very successful in cases like our target binary because the iterative process of mutation with a direct feedback loop was able to figure out expected data and progress with mutation until our program crashed.
There are however two types of drawbacks that we might experience - localized and joint changes. First case happened when I was testing BitFlip mutation strategy - feeding the engine with character X and expecting it to mutate into A through a single bit flip is futile endeavor as long as partial mutations are not retained. Another example would be in the case of data format with internal checksums (like PNG) - a single mutation is very unlikely to trigger new coverage as long as the checksum remains wrong.
Future plans
In the upcoming parts I will focus on small ways to speed up the fuzzing process. We are going to work with patched binaries, performance counters and maybe even process snapshotting - everything to squeeze every bit of speed from our existing fuzzer architecture. I hope that this path will lead us to solutions like native code instrumentations. Eventually I would like to tackle a new set of targets - ones that have strict syntax validation and will require grammar fuzzing.
I hope that you’ve enjoyed the ride so far and stay tuned for more.
Footnotes
-
I hope to explore the topic of system programming in Rust more in future articles that are not necessarily focused on fuzzing. ↩
-
In my initial mutator I’ve failed to properly calculate boundaries during inserting of blocks so my mutator never actually appended blocks at the end of the data being mutated. Would have probably missed that if not the strong expectation of a certain result failed to be satisfied. ↩
-
Successful in this case is defined as leading to new unique coverage. ↩